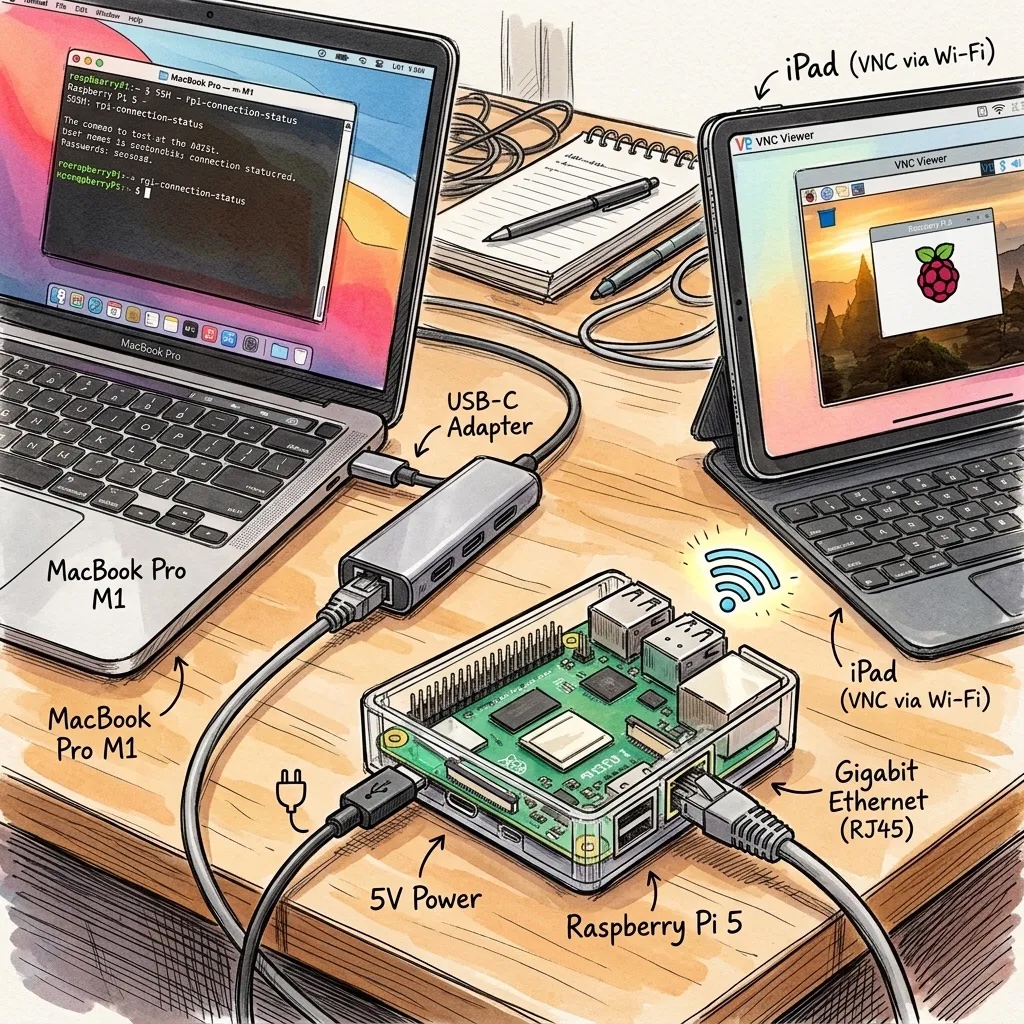
A practical guide to a stable direct link, and a companion to “Connecting a Raspberry Pi Zero 2 W to an iPad Over USB“.
The short version
On a Raspberry Pi Zero 2 W, one USB cable can power the board and carry a network link to your iPad or Mac. That trick does not carry over well to the Raspberry Pi 5. The Pi 5 wants far more power than a laptop or tablet port will supply, its USB-C port only speaks USB 2.0 (480 Mbit/s), and in our testing its USB gadget mode never attached to a Mac at all.
The approach in this article is simpler and more robust:
- Power the Pi 5 from its own 5 V / 5 A (27 W) USB-C supply.
- Boot it from an NVMe SSD.
- Connect it to your computer over the gigabit RJ45 Ethernet port, with the Pi acting as a tiny DHCP server.
- Use SSH and VNC over that link.
The same setup works for a Mac, a Windows PC, an iPad and most other devices, and none of it depends on USB gadget quirks.
How this relates to the Zero 2 W article
Our earlier article, “Connecting a Raspberry Pi Zero 2 W to an iPad Over USB”, builds a network link out of USB gadget mode: the Pi pretends to be a network adapter (g_ether or g_ncm, built with configfs on current kernels) and the iPad treats it as Ethernet. It is the right tool for the Zero 2 W because:
- The Zero 2 W has no Ethernet port.
- It draws very little power, so a phone or tablet port can run it.
- It has a genuine OTG data port that was designed for gadget mode.
The Pi 5 is a different animal. It has gigabit Ethernet, a PCIe connector for NVMe storage, a much larger power appetite, and a USB-C port that exists first of all to power the board. So the Pi 5 version of the same goal, “one direct link to my iPad or Mac”, uses a different path.
Two things carry over unchanged from the Zero 2 W article: the NetworkManager “shared” connection that hands out IP addresses, and the lessons about VNC clients. If you own a Zero 2 W, read that article for the USB approach. If you own a Pi 5, stay here.
Why not just use the USB-C port, as on the Zero?
The Pi 5’s USB-C port is a power input that can also, in principle, act as a USB device. Three practical problems follow.
It is USB 2.0 only. In device mode the port tops out at 480 Mbit/s, and real network throughput over a gadget link is lower than that.
It needs extra configuration. The port defaults to host mode. You have to force peripheral mode with dtoverlay=dwc2,dr_mode=peripheral and then build the gadget yourself, because current kernels no longer ship a simple g_ncm module.
It did not work with a Mac in our testing. With peripheral mode enabled, the controller appeared (/sys/class/udc/ listed it) and the gadget bound, but the state stayed not attached and the Mac never saw a device. Tried a direct USB-C cable, a USB-C to USB-A adapter and a dock. The symptom matches an open issue reported on Raspberry Pi’s own usb-gadget project, where the link stays in NO-CARRIER with a macOS host. Gadget mode on the Pi 5 is not something to build a workflow on today.
There is also a power problem, covered next: if the same cable has to carry power and data, you need a splitter that keeps the two apart, and cheap “USB-C splitters” are usually built for charging phones, not for this.
Argument 1: the Pi 5 needs a 5 V / 5 A supply
The official Raspberry Pi 5 power supply is rated 5.1 V at 5 A (27 W), and also offers the PD profiles 9 V / 3 A, 12 V / 2.25 A and 15 V / 1.8 A. The Pi 5 asks for the 5 A profile so it can give its USB ports their full current budget (1.6 A).
What happens with less:
- With a source that only offers 3 A, the Pi 5 still boots, but it limits the current available to USB peripherals (600 mA in total) and shows a power notice.
- A laptop or tablet USB-C port is designed to charge a device, not to feed a single-board computer, an SSD and peripherals. It will often supply well under what the Pi 5 asks for, and it drains the host’s battery while doing so.
- If power and data share one cable, a dip in power can show up as a dropped connection rather than as a clear error.
Powering the Pi from its own supply removes all of that. Power and data take separate paths, the host is never asked to be a power source, and there is no need for splitter cables, hubs or role negotiation between two USB-C ports.
A note on cables. Carrying 5 A over USB-C requires a cable with an e-marker chip, and many cheap cables, including cables permanently attached to some wall adapters, may not identify themselves as 5 A capable. That can trigger the “supply cannot provide 5 A” notice even when the adapter itself can. The notice is conservative. To see whether the Pi actually suffers, run:
vcgencmd get_throttledA result of throttled=0x0 means no under-voltage has been detected since boot. In our case the notice appeared on a 27 W adapter with a fixed cable, while get_throttled stayed at 0x0. If you want the notice gone, the zero-guesswork fix is the official Raspberry Pi 27 W supply with its own cable.
Argument 2: an NVMe SSD changes the equation
An NVMe drive is a good match for this approach, for four reasons.
It does not use USB. NVMe talks to the Pi 5 over the PCIe connector, so it is completely independent of whichever link you use to reach the Pi. A slow or finicky USB link cannot throttle your storage.
It is much faster than an SD card. At the officially supported PCIe Gen 2 speed you can expect something on the order of 400 MB/s, against roughly 100 MB/s at best for an SD card, and far less for small random writes. Docker images, package updates and builds feel noticeably different.
It makes the link the bottleneck, which is where you want it. With fast storage, a 480 Mbit/s USB link becomes the slowest part of the chain. A gigabit Ethernet link (about 110 MB/s in practice) keeps up much better.
It lasts. SD cards wear out under constant small writes. An SSD handles a development workload far better.
The trade-off is power. An NVMe drive adds to the Pi’s draw, especially during writes, which is one more reason to give the board its own 5 A supply rather than borrowing from a host.
Argument 3: USB 2.0 (480 Mbit/s) versus gigabit RJ45
The numbers, with realistic expectations:
- USB 2.0 gadget link: 480 Mbit/s on paper, which is 60 MB/s at best. Real-world throughput is typically around 30 to 40 MB/s, and USB 2.0 is half-duplex, so uploads and downloads share the same bandwidth.
- Gigabit Ethernet: 1000 Mbit/s on paper, roughly 110 MB/s in practice, full-duplex.
For typing in a terminal or using a VNC session, either link is fast enough. The difference appears when you copy images, repositories, backups or Docker layers to and from the NVMe drive. Ethernet is about three times faster there, and it has none of the host/device negotiation that failed in our USB tests.
Ethernet has one cost: you need a cable, and a Mac or iPad usually needs a USB-C to Ethernet adapter. Those adapters are common, cheap and well supported, and they are an ordinary USB host use case, which is the best-trodden path USB has.
Hardware checklist
- Raspberry Pi 5.
- An official 27 W USB-C power supply, or any supply that offers 5 V / 5 A, with an e-marked cable.
- An NVMe SSD with an M.2 HAT or an NVMe case (in this particular case used an Argon ONE V3 M.2 case).
- A short Ethernet cable.
- A USB-C to Ethernet adapter for the Mac, iPad or laptop that lacks an RJ45 port.
- A microSD card, even if you boot from NVMe, as a recovery tool.
Step 1: Power
Plug the official supply into the Pi’s USB-C power port. Do not power the Pi from the Mac or iPad. If you use a case with a power connector inside, make sure it is fully seated, because a half-seated connector causes boot problems.
Step 2: Operating system and NVMe boot
Use Raspberry Pi OS (Desktop). In our testing, Raspberry Pi OS ran cleanly on the NVMe drive that Ubuntu repeatedly corrupted (see the lessons section below). Flash it with Raspberry Pi Imager, enabling SSH and your Wi-Fi in the advanced options.
Boot once from a working card or drive, then update the firmware:
# Refresh package lists and install all updates
sudo apt update && sudo apt full-upgrade -y

# Update the bootloader (EEPROM) to the latest release; old versions have NVMe quirks
sudo rpi-eeprom-update -a

# Reboot so the new bootloader is used
sudo reboot
If you use an official M.2 HAT+, PCIe is enabled automatically. Other boards need dtparam=pciex1 in /boot/firmware/config.txt. Keep the PCIe link at its default Gen 2 speed; do not force Gen 3.
Write the OS to the NVMe drive with Raspberry Pi Imager (it appears as a target disk), then set the boot order:
# Opens the configuration menu; go to Advanced Options > Boot Order and pick NVMe/USB Boot
sudo raspi-config
If you use an Argon ONE V3 case, Argon provides its own scripts for the case firmware and power button. Read a script before piping it into a shell, then run:
curl https://download.argon40.com/argon-eeprom.sh | bash
curl https://download.argon40.com/argon1.sh | bash
After rebooting, confirm that you are really running from NVMe:
# The root partition (/) should sit on nvme0n1p2, not mmcblk0p2
lsblk
Step 3: Make the Pi hand out IP addresses on its RJ45 port
The Pi will act as a small router on the Ethernet cable: it takes a fixed address, runs a DHCP server, and shares its Wi-Fi internet with whatever you plug in. This is the same idea as the usb0-share profile in the Zero 2 W article.
First check the interface name:
# Look for the ethernet device; on our Pi 5 it was eth0, some systems use end0
nmcli device status
Then create the profile in one command:
# Remove any earlier half-configured profile so you do not end up with duplicates
sudo nmcli connection delete eth0-share 2>/dev/null

sudo nmcli connection add type ethernet ifname eth0 con-name eth0-share \
  ipv4.method shared \
  ipv4.addresses 10.55.0.1/24 \
  ipv6.method disabled \
  connection.autoconnect yes \
  connection.autoconnect-priority 10
What each option does:
ipv4.method sharedgives the Pi the fixed address below, starts a DHCP server on the cable and shares the Pi’s internet through NAT.ipv4.addresses 10.55.0.1/24is the Pi’s own address; clients receive 10.55.0.x leases.ipv6.method disabledprevents the connection from sticking in “connecting (getting IP configuration)” while it waits for IPv6 on a link that has no router. Hit exactly this problem on both Pi models.connection.autoconnect yesbrings it up at every boot and whenever a cable is plugged in.
Activate it and check:
sudo nmcli connection up eth0-share

# eth0 should say "connected" with eth0-share, and ip a should show 10.55.0.1/24
nmcli device status
ip a show eth0
If you installed the standalone dnsmasq package earlier, disable it so it does not fight NetworkManager’s built-in DHCP server:
sudo systemctl disable --now dnsmasqStep 4: Connect your devices
Plug the Ethernet cable into the Pi, and the other end into the computer or the adapter. The device should receive an address like 10.55.0.x within a few seconds. A 169.254.x.x address means no DHCP offer arrived (see troubleshooting).
Mac. Connect the USB-C Ethernet adapter (unless your Mac has a port), then open System Settings > Network and check that the adapter shows as connected with a 10.55.0.x address and “Using DHCP”. Then:
ssh <your-username>@10.55.0.1Windows PC. Plug in. Windows picks up the DHCP lease automatically. Use PowerShell or an SSH client with the same address. Use the IP address rather than raspberrypi.local, because the .local name depends on mDNS support.
iPad. Use a USB-C to Ethernet adapter. iPadOS lists it under Settings as Ethernet and shows the 10.55.0.x address. Then use an SSH or VNC app of your choice and connect to 10.55.0.1.
Android. Most recent phones accept a USB-C Ethernet adapter and use it as a wired network. Test with Pixel 8 only in USB gadget mode, not with Ethernet, so check your phone’s network settings after plugging in.
Because the Pi is also on Wi-Fi, the shared connection gives the other device internet access through the Pi. That is convenient, but remember it when you are on a network where that matters.
Step 5: Remote desktop (VNC)
Current Raspberry Pi OS Desktop uses a Wayland compositor with a VNC server called wayvnc. Confirm what is listening:
# Port 5900 should be owned by wayvnc
sudo ss -tlnp | grep 5900
Use TigerVNC, not Apple’s built-in Screen Sharing. The macOS app showed “Unable to communicate” or asked only for a password and no username when pointed at wayvnc, even though ping and SSH worked. The likeliest reason is a difference in how the client and server negotiate the VNC security handshake: wayvnc offers plain password authentication, and Apple’s client is built around other servers. TigerVNC connects fine:
brew install --cask tigervnc-viewerConnect it to 10.55.0.1:5900.
If the image looks blurry, it is almost certainly scaling, not compression. Tried Raw encoding at maximum quality with no change. A headless Pi has a virtual display (ours was 2048×1080), and a Retina Mac stretches that image to fill its window. Raising the Pi’s virtual resolution and letting the viewer shrink it fixes this, because downscaling stays sharp and upscaling does not:
# List outputs; on a headless Pi the name was NOOP-1
wlr-randr

# Use a plain lowercase x between the numbers, not the multiplication sign
wlr-randr --output NOOP-1 --custom-mode 2560x1440
Then set TigerVNC’s scaling to fit the window (the menu wording varies by version). The resolution setting resets on reboot. To make it persistent, add the same wlr-randr line to ~/.config/labwc/autostart; not verified this on every image, so check the output of wlr-randr after a reboot. If a monitor is attached, the output name will differ.
If you see only a gray screen, the Pi has booted to console mode, so there is no desktop for wayvnc to capture. Switch it back:
sudo systemctl set-default graphical.target
sudo reboot
Troubleshooting
The Mac keeps a 169.254.x.x address. Check nmcli device status on the Pi. If eth0 is stuck on “connecting (getting IP configuration)”, disable IPv6 on the profile and bring it up again. If the interface is called end0, your profile points at a device that does not exist; recreate it with the right name. Replug the cable once afterwards, because macOS sometimes holds on to the fallback address.
“Read-only file system” errors when adding connections. This is not a networking problem. The root filesystem flipped to read-only, usually because the storage reported I/O errors. Check dmesg | grep -i "i/o error".
NVMe I/O errors or no NVMe at all. Run dmesg | grep -i pcie and look for “link up” on the external PCIe controller; “link down” means the drive, ribbon cable or carrier board is not making contact. Reseat the flat cable fully and check its orientation. To test the drive itself, put it in a USB enclosure on another machine and run smartctl -a and badblocks -sv.
Power notice at boot. Run vcgencmd get_throttled. A value of 0x0 means the Pi has not detected under-voltage, and the notice is about the negotiated current.
Lessons from our NVMe testing
Three things surprised us and are worth knowing before you spend an evening on them.
A healthy drive can still fail on the Pi 5’s PCIe link. One SSD produced repeated read and write errors and a read-only filesystem within a minute of booting, yet it later passed a full surface scan with zero bad blocks and a clean SMART status. A second drive, a Crucial P3, ran normally on Raspberry Pi OS in the same case with the same cable. Choose a drive from your case maker’s tested list.
Ubuntu was unstable on this hardware. The Crucial P3 worked on Raspberry Pi OS and then showed the same freeze and corruption under Ubuntu, once an update started writing heavily. Found no forced Gen 3 setting in Ubuntu’s config. The best-supported suspect is PCIe power management (ASPM), and the kernel parameters pcie_aspm=off nvme_core.default_ps_max_latency_us=0 are commonly suggested for it, but did not get a confirmed fix. If you want a stable result, use Raspberry Pi OS.
Do not trust a damaged install. After a filesystem has dropped to read-only during writes, reflash it rather than repairing it in place. Keep the SD card as a recovery option, and remember that the Pi 5 may keep preferring an attached NVMe drive; remove the drive to force an SD boot.
Summary
The Zero 2 W gets by with one USB cable because it is small, cheap to power and has a real OTG data port. The Pi 5 is a different machine: give it its own 5 V / 5 A supply, boot it from NVMe, and link it to your Mac, PC or iPad over gigabit Ethernet with a shared NetworkManager profile. You trade a single-cable convenience for a link that is about three times faster, needs no USB role negotiation, behaves the same on every device, and leaves the Pi’s power and storage out of the host’s hands.
Disclaimer
This article is for informational purposes only. It involves editing system configuration, firmware and network settings, and running scripts from the internet. Follow it at your own risk: the author accepts no liability for data loss, hardware damage or other problems. Back up important data first, and check commands against your own hardware and OS version.
